One of the most important duties of a production DBA is to ensure backups are happening regularly. No one wants to face a manager and tell him/her “I’m sorry, but the most recent backup I have is from a week ago”. Create a SQL backup report, so you can review your situation!
My production environment is rather large, so it would be easy to rely on backup failure alerts. Don’t fall into that trap!
You are trusting that both your backup system, your notification system AND your email system are all in working order, and that’s a lot of trust. I much prefer being proactive, which includes verifying manually (as often as i can afford) that my backups ran.
To address that need, I wrote the following script. Once a week, I run it against a Registered Server list (you have one of those, right?). After a few seconds, you will have a complete list with the last time each database was backed up, as well as backup type, and age of the backup.
 SELECT DISTINCT DatabaseNames.NAME                                 AS NAME,
                Max(bs.backup_start_date)                          AS
                [Latest Backup],
                Datediff(dd, Max(bs.backup_start_date), Getdate()) AS
                [Backup Age],
                CASE
                  WHEN type = 'D' THEN 'Full'
                  WHEN type = 'I' THEN 'Differential'
                  WHEN type = 'L' THEN 'Log'
                  ELSE 'Some other type'
                END                                                AS
                Backup_Type,
                CASE
                  WHEN Max(bs.backup_start_date) IS NULL THEN 'NEEDS BACKUP'
                  WHEN Datediff(dd, Max(bs.backup_start_date), Getdate()) > 1
                THEN
                  'NOT UP TO DATE'
                  WHEN Datediff(dd, Max(bs.backup_start_date), Getdate()) = 1
                THEN
                  'DATABASE BACKED UP'
                  WHEN Datediff(dd, Max(bs.backup_start_date), Getdate()) = 0
                THEN
                  'DATABASE BACKED UP'
                  ELSE 'PLEASE REVIEW MANUALLY'
                END                                                AS Status
FROM   sys.databases AS DatabaseNames
       LEFT OUTER JOIN msdb.dbo.backupset AS bs
                    ON bs.database_name = DatabaseNames.NAME
WHERE  databasenames.NAME NOT IN ( 'tempdb', 'reportservertempdb' )
GROUP  BY DatabaseNames.NAME,
          type
HAVING Datediff(dd, Max(bs.backup_start_date), Getdate()) > 0
--more than 1 day since last backup
ORDER  BY NAME,
          backup_type
Look at all those backups!
From here, there’s a couple of directions you could go. You could save the output somewhere, if that’s part of your audit requirements! Or you could automate this report to yourself, as long as you have enough discipline to still review it… I find that emails are easy to ignore when you get > 100 emails/day, so if that’s you, I would keep on running it manually.
If your environment looks anything like mine, you’ll be spinning up new SQL instances in a pretty regular basis. The SQL install process has gotten much better over the years, but it’s still a slog to go through the same prompts over and over again. My favorite solution for this conundrum is to install SQL Server using a unattended script. It does take a bit of work to get the config file just right, but it will save you a lot of time in the long run.
The heart of the Unattended process is the Configuration file: During a regular SQL install, and as you select options, services, paths, etc., those options are saved to the configuration file. Once you’re ready to start, the installer reads through the file and sets everything up. The key, then, is to save the configuration file before you actually kick off the install. As is, the file is not yet usable, but once we’ve make a few changes to it, you’ll be able to use this same file over and over again.
1st step – Start a new SQL install
Here you’ll just start a server install, like you’ve might have done many, many times already:
Select all the options you’d normally do. For my servers, I always install the engine itself, Integration services and replication, among a few others. You can always change the config file afterwards to add or remove features, or even have multiple files.
Note that in the service settings, you’ll be prompted to enter the service account and password. The password is not actually saved in the config file, but you can’t progress until you enter one, so go ahead and fill it in.
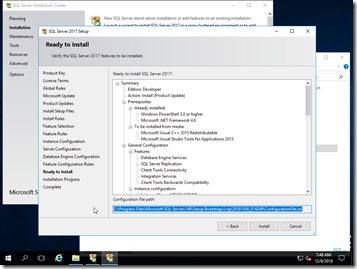
In the “Ready to Install” window, you’ll get a chance to review all your options before you click on the “Install” button, effectively starting the install. DO NOT click Install! Instead, note the location of the configuration file (which I highlighted in the screenshot above), and open that file, then save it somewhere safe! I support multiple SQL versions, so I keep each file in their respective ISO folder.
2nd Step – Edit the config file
And here’s the file! For a smooth and easy server install, you’ll need to modify the items below:
IACCEPTSQLSERVERLICENSETERMS – Set it to True. This is the SQL server terms of licensing, and you have to accept it if you want to use it!
UIMODE – On SQL 2016 and older, I’ve always just set this to Normal, and QUIETSIMPLE to True. SQL2017 has changed things a bit, so now I’m setting QUIETSIMPLE to FALSE, passing QUIET via the command line (with /Q), and commenting out UIMODE altogether.
UPDATEENABLED – This is really handy if you want to install and patch your install at the same time. At work, I have our installs folders organize like the image below. You can’t see it in this screenshot, but in each version folder I keep both the ISO and the decompressed image. You can’t use unattended with the ISO file alone, but I keep the ISO around just in case.
In the Updates folder, I keep the last few CU and SP files for their respective SQL versions. When UpdateEnabled is configured, and a proper path is set (you’ll see that below) SQL will scan that directory and install the latest versions of whatever files you have in there.
FEATURES – This is what specific services and features you’d like installed. You can always change this later.
UPDATESOURCE – This is location where the installer will look for the patch files, as mentioned above. You’ll probably want to use a network share for this.
AGTSVCACCOUNT, ISSVCACCOUNT, SQLSVCACCOUNT – This is where you’ll specify the service account for SQL Agent, SSIS and SQL Server. You can use the same account for all 3, or a different account for each, or however your organization prefers it.
SECURITYMODE – This enables SQL auth, along with Windows Auth. If you set this to SQL, you’ll also need to specify an SA password in the command line. Generally you don’t want to do that, as each of your SQL servers should have a different SA password. For my lab, I’m just going to set this to SQL. At work, we leave this on windows auth, then after the machine is up and running, I go back in and generate a unique SA password, as part of our configuration checklist (you do have one of those, right?)
A lot of the other details, such as install location, were taken from when you went through the wizard, so they don’t need to be reentered here. Once you’re satisfied with your changes, go ahead and save the file. We’re ready to test it!
Part 3 – SQL Install – for reals now
Launch the command prompt as Administrator, navigate into your installation media directory, then type
setup /?
So helpful! For SQL 2017, you’ll be greeted with all the parameters that can be passed into setup, including a full example of an unattended install command. We just have to fill in the blanks, more or less. Do note that you can run this from a network share, just pass the full FQDN path.
Another thing to note is that we only enter the password in the command line. I’m using the same password for all the services, but again, you should use different accounts, and your service account password should be different from your SA password. Think security!
Once you enter all that in, go ahead and hit enter. After a few mins, it should be all done! You’ll get an error message if there are any issues, otherwise you’ll just be returned to the prompt.
And that’s it! You’re now the owner of a brand new SQL instance. I have the install string saved without the passwords, so next time I need to install a new server, I copy the string, enter in the passwords, then hit enter and go about my day. 10 mins later, it’s up and ready for final touch ups (like MaxDop, Memory settings, etc). Happy installing!
SQL Server Security should be in the top of your priority list. In the perfect world, once a user has left the company, you’d receive a notification to remove the login from your SQL server. Unfortunately, that doesn’t happen often enough. Too many stale users can increase your security footprint and make SQL server security harder to manage. Also ideally, you’d be manage your security via groups, instead of users. That way, once an AD account is disabled/dropped, then the group is automatically updated.
I’m big on being proactive and keeping my servers clean and secure, so I wrote the following script. This script builds a list of AD logins, check their status, and optionally drops them. If ActiveDirectory returns any kind of errors, then it drops the login. If you feel like this is a bit too drastic, then you can comment out line 25! Then all the script does is print out the list of candidates. Once you have that list, you can verify the candidates before you actually pull the trigger on them.
USE master

DECLARE @users TABLE ( pk INT IDENTITY(1,1),
username sysname)

INSERT INTO @users ([username])
SELECT name FROM sys.server_principals
WHERE type_desc = 'windows_login'

DECLARE @username sysname
DECLARE @i INT = 1

WHILE @i <= (SELECT MAX(pk) FROM @users)
begin
SELECT @username = username
FROM @users WHERE pk = @i

BEGIN try
EXEC xp_logininfo @username
END TRY

BEGIN CATCH
IF ERROR_NUMBER() >0
PRINT @username
EXEC ('DROP login ['+@username+']')
PRINT ERROR_NUMBER()
PRINT ERROR_MESSAGE()

END CATCH

SELECT @i = @i + 1
end
Another thing to keep in mind is that this script does not remove the users from the databases, so the permissions in the database itself are preserved. This presents a bit of a fork on the road, and the direction you go depends on your security policies (or paranoia)
If your requirement is to just totally clean up old users, then you should loop through each database and remove the respective users from there as well.
If there’s a chance the login should not be removed (maybe an old service account?), then preserving the user within the database would preserve the permissions. That way, if you have to add the user back, most of the database-level permissions are still there.
We’ve all been there, at some point: You set up a new QA server, but you’re a busy guy, and put off setting up alerts for later. The server gets a ton of usage, and all of a sudden, it runs out of space before you had a chance do something about it. This post is about one we way I use to recover from disk full errors.
In this particular case, we created a new SSIS catalog. The SSISDB database is created by the system, so at first you don’t get to select where the files are located. Sure, you could’ve modified the database defaults post-setup, but you didn’t do that either! Now the log file is in the data volume, and the volume is all filled up. You’d like to move the log file, but you can’t detach SSISB because, again, the volume is full and nothing works right. So what do you do?
Whenever SQL server restarts, it reads the entries from sys.master_files and sys.databases to figure out where the databases are. When you alter any of the database properties, those changes are registered in that table. So what we need to do here is update those entries (not directly, please!) and then restart the service. Since this particular server is non-prod, restarts are ok! So here’s the syntax:
--run this first to get the current logical name, you'll need this for the next step
SELECT DB_NAME(database_id),
       name,
       physical_name
FROM sys.master_files;
--Now the actual trick, where filename is the physical name of the file
ALTER DATABASE SSISDB
MODIFY FILE
(
    NAME = 'log',
    FILENAME = 'L:\sqllogs\ssisdb.ldf'
);
After this, stop SQL and manually move the file to the new location (as defined in your script — SQL will not move the files for you). When done, start SQL again. Your database should come right up!
Now, let’s say that, in your hurry to get things back up, you restarted the service but forgot to actually move the files. Despair not! As long as SQL hasn’t acquired a filesystem lock on the files, the following commands will allow you to move the files to the proper places. Once everything is in the proper places, the following commands will initialize the database:
ALTER DATABASE SSISDB SET OFFLINE;
ALTER DATABASE SSISDB SET ONLINE;
This is a bit of a drastic script: every now and then I’ll have a misbehaving user or application that will create way too many sessions, causing all sorts of issues. I could kill the sessions one at a time, but that’s such a drag! So let’s terminate those user sessions!
Even inactive sessions can be an issue: For every open session, SQL needs to allocate a bit of RAM and CPU to maintain that connection. If you have a ton of sessions that are just idle, then you could be wasting memory that other sessions could use. This is basically how DDOS attacks work: Overwhelm the server with connections until you run out of resources.
That’s why I created the script below — you give it a user name, and it kills every session associated with the login. You can even filter it down to just one database! Or not, that’s totally your call. All I can tell you is that it does what the name says: it slays all, and that’s just metal.
DECLARE @spids TABLE (pk INT IDENTITY(1,1), spid SMALLINT)
DECLARE @i INT = 1
insert INTO @spids(spid)
SELECT s.spid FROM sys.sysprocesses s
INNER JOIN sys.server_principals p ON s.sid = p.sid
WHERE p.name = 'username' --kill all logins for that one user
--and DB_NAME(dbid) IN ('dbname') --kill all users in that one database
DECLARE @sql VARCHAR(1000)
WHILE @i&amp;amp;amp;lt;=(SELECT MAX(pk) FROM @spids)
BEGIN
SELECT @sql = 'kill '+ CAST(spid AS VARCHAR(100)) FROM @spids WHERE pk = @i
PRINT @sql
EXEC (@sql)
SELECT @i = @i + 1
end
Creating a new VM on ESXi is pretty easy! I love the web-based client that’s available on 6.7.0, so that’s where we’ll go.
I do realize the product is also called vSphere Hypervisor, but it used to be, and in a few places, is still called ESXi, so I’m going to stick with that name for this post.
The first step is to upload all your ISO’s into the Datastore, since this is the preferred way to attach them to the guest; you can use the host drive, but that’s not nearly as convenient, specially you’re going to setup several VMs. To attach an image, login to the VMWare hypervisor and then:
Navigate to the Storage menu, in the Navigator (the menu on the left side), and then click on “Datastore browser”
The mighty datastore
In the datastore root, click on “Create directory” to create a folder for your images.
Find your files!
Next, click on the “Upload” button to navigate to your local disk, and select the ISOs to upload. You can only select one at a time, but you can queue them up.
Now that we have our images ready, it’s time to create the VM! To do that:
Head into the Navigator, and select “Host”, then click on “Create/Register VM”
For this tutorial, we’re creating a new VM from scratch, so we’ll select “Create a new virtual machine”. If you already have a set of files for an existing VM, you can select “Deploy a virtual machine from an OVF or OVA file”, or “Register an existing virtual machine”.
Let’s get started!
Next we get to give it a name. I like things to be descriptive, so “SQL” it is. Note that this is not the Host name within the guest, this is just the alias within VMWare, and they can be totally from each other. We can also select Compatibility, Guest OS family and Guest OS version. Like VirtualBox, these options will drive the default settings for RAM, CPU, etc, and will not impact functionality. If you’re just running a home lab, you can leave “Enable Windows Virtualization Based Security” unchecked.
In this dialog, we choose where to save the VM files. I only have the main datastore, so that’s the only option I have. If you have multiple local volumes, and you have a dedicated volume for guests, one for the OS, etc, then you can select your preferred volume here.
In the next dialog we get to select the actual guest settings. Choose whatever is appropriate for your guest. You’ll also notice that under “CD/DVD Drive 1”, I’m being prompted to select an ISO image. The default option here is “Host device”, but you’ll want to switch that to “Datastore ISO file”, then click on the “Browse” button to navigate to the folder you created previously. From there, select the image for your OS of choice, then click on “Select”.
You’re almost done! Review the settings one last time, then click “Finish”.
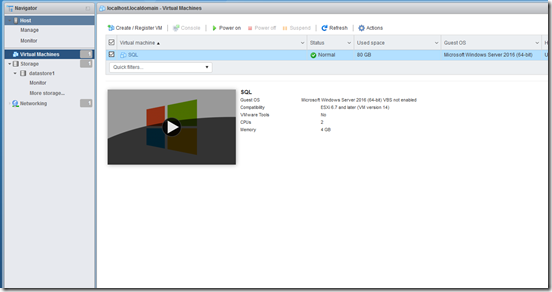
Now that we’re back in the Navigator, select “Virtual Machines” and you should see your guests. To start them up, simply click on the “Play” button. From here on out, it’s just a matter of installing the OS, and that’s the topic of a whole other tutorial.
That’s the end of my ESXi series for now! From here on out, I’ll be using VirtualBox for all my posts. ESXi is definitely the more powerful option, but since I’m just running a simple home-based lab, VirtualBox is more than adequate.
You should always keep detailed documentation on each of your servers as part of your DR scenario.This document will become your holy grail in case you ever have to recover your servers.
True story: Our BI team had 3 servers, and one of them was 2 weeks away from being retired. Suddenly, in the middle of the afternoon, the server went off-line. I contact our infrastructure team, and ask them to take a peek into the server itself, in the server room, and tell me what happen. After 10 harrowing minutes later, they return and deliver the grisly news: the motherboard had fried, and the box was dead. Lucky for me I had current backups of all the databases, but not of the replication Publications. Those can be rebuilt, sure, but it would have saved me a bunch of time if I had those pubs scripted out.
Again, your documentation should be thorough. Here’s a few things that should be part of your documentation:
What are my driver letters?
How much disk space do I have?
Who are all my local admins?
What are my server IPs?
If using SQL Replication, save your publication scripts
etc….
Sure, you can have a lot of this information from database backups. But always hope for the best, and plan for the worst!
For this post, this is the script we use to document the IP addresses for our server farm:
SELECT
CONNECTIONPROPERTY('net_transport') AS net_transport,
CONNECTIONPROPERTY('protocol_type') AS protocol_type,
CONNECTIONPROPERTY('auth_scheme') AS auth_scheme,
CONNECTIONPROPERTY('local_tcp_port') AS local_tcp_port,
CONNECTIONPROPERTY('client_net_address') AS client_net_address
In future posts, we’ll go into more details on our DR documentation strategy.
In this longer post, we’ll get started with ESXi, how to install it and login. ESXi is meant to run as the OS, and to be very minimal so there’s as much resources as possible available for the guest OS’s. Even the install is very spartan! Lucky for us, however, it is fairly straight forward to install.
Once you boot from the ISO, you’ll be greeted with the welcome screen. Not much to note here.
Agree to the EULA and move ahead…
Select the disk to install the main OS on. Do keep in mind that this will format your disk, so any existing content will be wiped out! Additional drives can be provisioned post-install, in the management site.
Select your preferred keyboard layout here.
Choose your admin password.
These are two interesting errors I got, but you’re not likely to see them. I was installing ESXi in a VirtualBox VM (so I could capture the screenshots), and I forgot to provision the proper amount of CPUs. So here, ESXi is telling me that it needs at least 2 CPU cores, or no install! It was a simple fix (just go back to the VM options and add more CPUs); but VMWare doesn’t expose hardware virtualization, so I got the second error regardless. You can still setup ESXi without hardware virtualization, however, as seen below.
Ok, this is it! Final confirmation
And now you’re done. Congrats!
The next time you reboot your box, this is what you’ll see:
There is some very minimal configuration you’ll be able to do from the console itself. To do everything else, you’ll need to navigate to the URL displayed in this screen (your IP will likely be different from mine). Login with the admin credentials you created earlier.
In our next episode, we’ll go over the basics of this UI and how to setup guests and all that fun stuff.
VirtualBox is a great virtualization tool if you plan on running VMs on your regular desktop. For this post, we’ll get started with Virtualbox by creating a new VM and booting off of an ISO.
As a preparation for a future post, I’m actually going to install ESXi within VirtualBox. ESXi is meant to run as a full OS, so you only want to install it if you have dedicated hardware for your VMs. The VM creation process is the same if you’re going to install Windows Server, Linux, etc, so no worries there.
Queue in the Inception jokes
From previous posts, you should already have VirtualBox installed. We’ll start by launching VirtualBox, and then clicking on New. You’ll be presented with this dialog
From here you can select the Operating System type. It doesn’t change the functionality of the VM per se, all it does is pre-select RAM, CPU and storage to match your selection.
Note that RAM is always soft-allocated: the VM will only use as much RAM as is required by the underlying guest. While that allows you to have more VMs than you have physical RAM (over-allocation), there’s nothing stopping the VMs from using up all their allocated RAM either, which will cause the Host OS to page down to disk, ending in severe performance degradation. Keep that in mind!
From this dialog, you can choose how to create your virtual disk. Generally speaking, you’ll want to select “Create a new virtual disk”. You can also add an existing virtual disk now, if you happen to have one.
VDI is the native file type for VirtualBox, so that’s what I prefer to go with.
VMDK is an open format, also supported by VMWare, so you should be able to grab an existing VMDK from, say, VirtualPlayer, and open with VirtualBox.
VHD is a format supported by Microsoft. It also has the added benefit that you can mount it in windows, just like any other ISOs.
You’ll now have to decide how the disk file will be built. You’ll usually want to do “Dynamically allocated”, so the file will grow only as the guest needs it. If you select “Fixed size” the file will be created at the full requested size. You will select the actual size in the next screen). The bigger the file, the longer it’ll take to complete the operation.
In this dialog you’ll also be prompted for the location of the data file. This is the last dialog! You’re now the proud owner of an empty VM, the equivalent of computer with an empty hard drive. Before you can get this puppy up and running, you’ll need to attach the ISO for whatever OS you’re going to install.
Select your VM, get the properties window, then select Storage, select the “Empty” DVD icon, then click on the DVD icon and click “Choose Virtual Optical Disk File” (whew). You can see that I previously used a windows 95 tools ISO file. In my case, I’m going to choose the ESXi ISO, but you can select whatever ISO you have (windows server, Ubuntu, etc). Click OK, select your brand-new VM and click “Start” to power it up.
And there you have it! You should now be greeted by the installer screen of whatever it is you’re installing.
For the next post in this series, we’ll walk through installing ESXi (which I hope you’re installing on real hardware!).
Index maintenance is one of those things that you have to stay on top of, in order to keep your data flowing smoothly. In no particular order:
Index defrags/rebuilds
Removing unused indexes
Optimizing existing indexes
Saving index definitions (ever had someone complain an index “went missing?”)
Move them to a separate filegroup/disk
Etc…
A few months back, we were having issues with heavy I/Os, so one of our plans was to move all the indexes into a separate filegroup, located in a different disk. This way, we’d end up with separate threads: One for the update itself, and one for the index update. The snag was that, overtime, new indexes were added to the original data filegroup, so now they were all over the place.
In an attempt to figure out the lay of the land, I wrote the following query. This script will tell you the filegroup an index lives in, which will help me identify what needs to be moved where. It does not include heaps (which are not indexes) and system indexes (because you should probably leave those alone).
SELECT ds.name AS FileGroupName,
       s.name AS schemaname,
       o.name AS TableName,
       i.name AS indexname
FROM sys.objects o
    INNER JOIN sys.indexes i
        ON o.object_id = i.object_id
    INNER JOIN sys.data_spaces ds
        ON ds.data_space_id = i.data_space_id
    INNER JOIN sys.schemas s
        ON o.schema_id = s.schema_id
WHERE o.is_ms_shipped = 0
      AND i.index_id > 1
ORDER BY ds.name,
         o.name,
         i.index_id;
Once I had them identified, it was easy to write some dynamic sql to move rebuild them into a new location. The syntax is easy:
CREATE INDEX [indexname]
ON table
WITH (ONLINE = ON, DROP_EXISTING = ON)
ON [filegroupname];
You have to write out the entire index definition as it currently stands, but the Drop_existing = ON will instruct SQL to recreate the index in the specified filegroup, instead of just complaining that the index already exists. Online = ON (if you’re on Enterprise edition) will allow you to run this without dropping the index first, or additional blocking.
Cookie Consent
We use cookies like the whole internet does. If you like cookies, please agree.
Contains information related to marketing campaigns of the user. These are shared with Google AdWords / Google Ads when the Google Ads and Google Analytics accounts are linked together.
90 days
__utma
ID used to identify users and sessions
2 years after last activity
__utmt
Used to monitor number of Google Analytics server requests
10 minutes
__utmb
Used to distinguish new sessions and visits. This cookie is set when the GA.js javascript library is loaded and there is no existing __utmb cookie. The cookie is updated every time data is sent to the Google Analytics server.
30 minutes after last activity
__utmc
Used only with old Urchin versions of Google Analytics and not with GA.js. Was used to distinguish between new sessions and visits at the end of a session.
End of session (browser)
__utmz
Contains information about the traffic source or campaign that directed user to the website. The cookie is set when the GA.js javascript is loaded and updated when data is sent to the Google Anaytics server
6 months after last activity
__utmv
Contains custom information set by the web developer via the _setCustomVar method in Google Analytics. This cookie is updated every time new data is sent to the Google Analytics server.
2 years after last activity
__utmx
Used to determine whether a user is included in an A / B or Multivariate test.
18 months
_ga
ID used to identify users
2 years
_gali
Used by Google Analytics to determine which links on a page are being clicked
30 seconds
_ga_
ID used to identify users
2 years
_gid
ID used to identify users for 24 hours after last activity
24 hours
_gat
Used to monitor number of Google Analytics server requests when using Google Tag Manager
1 minute
You can find more information in our Cookie Policy and .